Of course, the short answer to this question is, it depends. However, there are some guidelines for label size that we can give you. We use 12" wide material on our digital label printing presses here at Lightning Labels, and the maximum printable area on this material is 10.75". We need to use some of the material for marks that assist in the die-cutting process. As far as length goes we can print up to 17" long. So that leaves a 10.75" x 17" print area that you have to work with. Keep in mind that we do need a gap between labels, and the standard gap is 0.125".
For smaller sized labels you will not notice much difference in pricing with slightly different sizes, but for the larger labels the difference can be significant. Let"s take an example that will demonstrate this. A 5" circle fits nicely 2 across and 3 down on what we call a frame (the 10.75" x 17" print area). The cost for 500 5" circles on our standard white BOPP with a gloss laminate is $362.86. Now, let"s consider a 6" circle. We can only fit one across and two down - this does not fit very well on our press at all. This is reflected in the pricing - 500 labels cost $528.23 - this is almost 50% more than the 5" circle.
So the answer to the original question is twofold - the best size is the size that will work best on your product and fits well on our press. When you play around with our Online Instant Quoter, you will often notice jumps in price for similar sized labels. This is always because certain sizes fit well on our press and others do not. If you want to get the best value for your labels always choose a size that fits well within the 10.75" x 17" frame, keeping in mind that the smaller the label the less expensive it will always be.
When you receive your roll of custom labels, you probably don’t think too much about the liner. All you care about is that your labels look great. But the release liner, as it is known, plays a vital role in supporting your labels so they can be peeled off easily. Have you ever wondered how the labels can be so easily removed from the liner, but very diffi cult to remove from any other surface?
The secret ingredient is silicone, a versatile polymer material that has excellent adhesive repelling properties. The liners for the materials we use here are all paper based, with a layer of silicone added to the paper to support the labels, protect the adhesive, and allow easy label application.
Release liners come in diff erent thicknesses and with diff erent properties. Our standard white BOPP material comes with a 50lb white paper liner, which is coated with a layer of silicone and has excellent strength and tear resistance. It is a good general purpose liner that is suitable for hand or automatic application.
If you order our Estate #9 textured cream material you will notice a diff erent liner. The liner here is a 44lb brown paper liner that is specially designed for high speed automatic application. This is because the Estate #9 material is popular in the wine industry, and most labels for wine are applied by machine.
Labels generally look better and are more durable with a laminate. A laminate can give your label a gloss or matte finish and it provides a protective layer between the ink on your label and the outside world.
Here at Lightning Labels, we almost always laminate the labels we print. It costs very little extra and it ensures that light scuffing will not damage the label in any way. What you may not realize is that we offer a number of laminates:
- High Gloss - our most popular laminate. It is the least expensive option and provides protection for the label and a high gloss shiny finish.
- Matte - provides your label with a quality matte finish. This is also the best laminate to choose if you want to hand write information on your labels.
- Thermal Transfer - a gloss laminate that is designed to work with most over-printing thermal transfer printers. We do recommend you get samples first to test through your own printer before placing an order with this laminate.
- UV Outdoor Gloss - best used for labels that will be used outdoors. It has a high gloss finish with excellent UV resistance. It is best paired with our vinyl material for the most durable outdoor label.
The price for these laminates are all slightly different. You can use our Instant Online Label Quoter to find a price for your labels with any of these different laminates. We also offer two materials that do not require over laminate and look great on their own: Estate #9 and Classic Crest. These materials are very popular with the wine industry.
If you want to sell your products in retail stores then you need to get a bar code. The bar code on most retail products in this country is called a UPC (Universal Product Code), and you obtain them from the Uniform Code Council. You first need to become a member of what is mysteriously called their GS1 US Partner Connections. The amount you pay is dependent on the number of products you will be selling, and your company"s gross revenues.
The processing time is usually just 3-5 days and then you receive your company prefix number. You can then create your full bar code number for each product with the help of the membership kit you will receive. Once you have your number you just need the software to create your bar code. Here at Lightning Labels we will be happy to take care of that step for you.
If you have a small number of products (less than twenty) there is a more cost effective way to obtain a registered UPC code. Just type “buy a bar code” into Google and you will see many companies selling barcode numbers for far less than the UCC membership fee.
One point to remember when you are designing your labels - keep a space for the bar code. The official size requirement is around 1" high x 1.5" wide. In reality we do bar codes here that are as small as 0.5" high and 1" wide. Any smaller than that and you will have difficulty scanning them. One last important point: your bar code needs to be on a white background so that it can be scanned easily.
The answer to that question is of course, “it all depends.” For most people our standard white BOPP material will work well. This is a great all purpose material, it is inexpensive, resistant to water and chemicals, quite durable, and has an attractive pearly shine to it. Unless you have specific needs, this is our recommended material.
Here is a list of our other materials with a brief explanation of each one:
- Clear BOPP - this has the same qualities as our White BOPP but in a clear version. It can provide a “no label” look when applied to your product. We can also do reverse printing on clear BOPP which is suitable for window labels.
- Chrome BOPP - has the same water and oil resistant properties as the White and Clear BOPP, but has the “mirror-like” look of shiny chrome.
- White Vinyl - is our thickest and most durable material. It is 4 Mils thick and is suitable for applications where greater strength or durability is needed. It is our recommended material if the label is to be used outdoors.
- Estate #9 (Textured) - is a cream colored textured material. It is very popular for wine labels, and labels for gourmet foods or high-end beverages. It is a paper stock and therefore not as durable as our BOPP materials, but it does have a unique look and feel that can be striking.
If you are still unsure what material you need then we suggest you request one of our free sample packs. This has actual label samples of all of our materials, so you can see for yourself which material would best suit your needs.
Before we answer that, let’s talk about the two kinds of proofs that we offer - PDF proofs and press proofs.
PDF Proofs
If color is not important to you a PDF proof is the way to go. The main advantage is speed, because files are sent via email and you can quickly look at the type and graphic elements to make sure they meet your expectations. Because colors vary between monitors and printers a PDF proof will not give you an accurate indication of the final press color.
Press Proofs
Also called a Hard Copy Proof, a Press Proof will show you exactly how your labels will look. It will be printed in full color on the same label material, it will have the same laminate, and you will see a die-line where the labels will be cut. We recommend Press Proofs for all new orders because you can see exactly how the colors will look when you receive your labels. And best of all your first Press Proof is free - you just pay for shipping.
Why bother with a proof?
In printing you should always double check your work, and then check it once more. We run across people who really think a proof is unnecessary and then when they get the labels they realize the mistake they have made. Proofing is all about preventing mistakes. We only recommend a PDF proof if color is not important at all. If you are even a little concerned about color you need to get a Press Proof. One of the many benefits of digital printing is that Press Proofs can be produced quickly and easily - make sure you take advantage of them. And then double check your proofs!
Simply put digital printing means producing a printed image that doesn’t use traditional printing plates. Basically, you go direct from an image on a computer to an image on a printed page. Digital printing has been around in some form for decades but it is only in the last 10 years or so that it has really come into its own.
If you own a laser or inkjet printer then you are doing digital printing. Whether it is a $40 inkjet printer or a million dollar digital printing press, the process is basically the same. The printer takes a computer image, which by definition is a digital image, and translates all the 0’s and 1’s into the appropriate color at the time of printing. Most color digital presses use four color process printing (see the previous question) which can produce millions of colors through a combination of Cyan, Magenta, Yellow and Black.
Comparing digital printing with traditional printing is useful to help understand how digital printing is different. Traditional printing uses a complex process with several steps. First, film is created for each color that is being printed. Then a printing plate is created from this film. Then the plate is mounted on a cylinder. Finally the cylinders for all the different colors are lined up and you can start printing. In digital printing a computer allows us to bypass all this.
Digital printing has secured the niche for short runs because of this reduced setup time. Not only that, but with digital label printing every label can be different. But for long runs of the same label you are often better off with traditional flexo label printing. In the label printing world digital printers print at 50-100 feet a minute, traditional label printing is typically 250-300 feet a minute.
Whenever you pick up a magazine or read a modern newspaper you are reading the product of four color process printing. It is a standard for printing color worldwide, but what does it really mean?
It is quite an amazing procedure. Basically we can break down all color into four primary colors: Cyan (blue), Magenta (a purplish red), Yellow and Black, this is what is known as CMYK (K for black). When you look very closely at any printed color picture from a newspaper, magazine or a label under a very strong magnifying glass, you will actually see that it is made up of a series of dots. Not only that but these dots are always either Cyan, Magenta, Yellow or Black, or a combination of these colors.
Back in the old days a camera was set up with different filters and screen angles and four separate photographs were taken of an image to create the CMYK separations. Today, computer software handles this complicated process with ease. So what appears to be continuous color is always just a series of dots of four primary colors.
Understanding the concept of a “full bleed” is important if you want color on your labels that extends right up to the edge. This is best explained by an example. Let’s look at the label above. What we want is a 3” x 5” finished label indicated by the black die-line. For this complete background coverage of color, we actually create a box that is slightly bigger than our finished label. For most instances the size of the finished art that we use to print the label is 1/16” larger on all sides. So, the box that we create is actually 3.125” x 5.125”.
What is the reason for this extra space? It has to do with the way a label is created. When labels are created they are first printed on the label material and then they are die cut into the shape you want. This cutting is a mechanical process and the material can drift ever so slightly (up to 1/32”) during the die cutting. If you just had color without a full bleed then when the material shifted slightly you would notice a white area at the edge of your label. By adding 1/16” of color to all sides of your label you will ensure you will get a finished product that looks good and has color all the way to the very edge of your label.
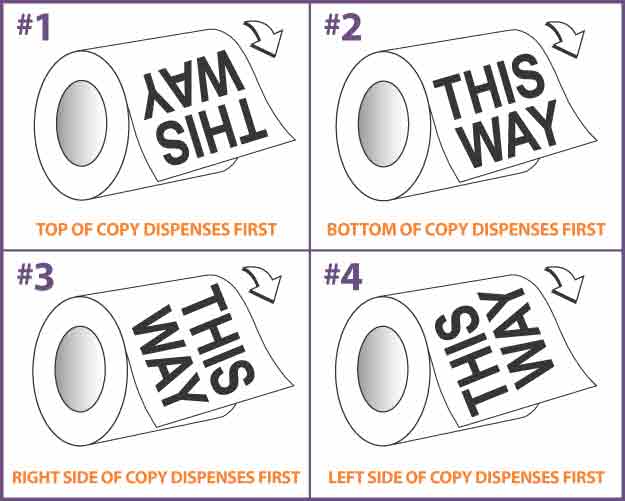
The unwind direction is simply the way in which a label unwinds from a roll. This is most easily explained by looking at the diagram above. There are four unwind directions. You can see that unwind direction #1 is when the top of the label comes off the roll first, #2 has the bottom edge coming off first, #3 is the right edge and #4 is the left edge.
Now, why is it important? Well, it is usually only important if you are having your labels applied by machine - if you are hand applying your labels then unwind direction typically does not matter. So, if you are applying your labels by machine, or having a contract manufacturer apply the labels then you will need to know the unwind direction. Most labeling machines will only be able to work with one unwind direction for each type of container.
One final point, if you are applying labels by hand now, but you may want to have them machine applied at some future point it is still good to consider unwind direction.
Labeling a Product: Labeling information
Of course, the short answer to this question is, it depends. However, there are some guidelines for label size that we can give you. We use 12" wide material on our digital label printing presses here at Lightning Labels, and the maximum printable area on this material is 10.75". We need to use some of the material for marks that assist in the die-cutting process. As far as length goes we can print up to 17" long. So that leaves a 10.75" x 17" print area that you have to work with. Keep in mind that we do need a gap between labels, and the standard gap is 0.125".
For smaller sized labels you will not notice much difference in pricing with slightly different sizes, but for the larger labels the difference can be significant. Let"s take an example that will demonstrate this. A 5" circle fits nicely 2 across and 3 down on what we call a frame (the 10.75" x 17" print area). The cost for 500 5" circles on our standard white BOPP with a gloss laminate is $362.86. Now, let"s consider a 6" circle. We can only fit one across and two down - this does not fit very well on our press at all. This is reflected in the pricing - 500 labels cost $528.23 - this is almost 50% more than the 5" circle.
So the answer to the original question is twofold - the best size is the size that will work best on your product and fits well on our press. When you play around with our Online Instant Quoter, you will often notice jumps in price for similar sized labels. This is always because certain sizes fit well on our press and others do not. If you want to get the best value for your labels always choose a size that fits well within the 10.75" x 17" frame, keeping in mind that the smaller the label the less expensive it will always be.
What is a “release liner”?
When you receive your roll of custom labels, you probably don’t think too much about the liner. All you care about is that your labels look great. But the release liner, as it is known, plays a vital role in supporting your labels so they can be peeled off easily. Have you ever wondered how the labels can be so easily removed from the liner, but very diffi cult to remove from any other surface?
The secret ingredient is silicone, a versatile polymer material that has excellent adhesive repelling properties. The liners for the materials we use here are all paper based, with a layer of silicone added to the paper to support the labels, protect the adhesive, and allow easy label application.
Release liners come in diff erent thicknesses and with diff erent properties. Our standard white BOPP material comes with a 50lb white paper liner, which is coated with a layer of silicone and has excellent strength and tear resistance. It is a good general purpose liner that is suitable for hand or automatic application.
If you order our Estate #9 textured cream material you will notice a diff erent liner. The liner here is a 44lb brown paper liner that is specially designed for high speed automatic application. This is because the Estate #9 material is popular in the wine industry, and most labels for wine are applied by machine.
What are the lamination options?
Labels generally look better and are more durable with a laminate. A laminate can give your label a gloss or matte finish and it provides a protective layer between the ink on your label and the outside world.
Here at Lightning Labels, we almost always laminate the labels we print. It costs very little extra and it ensures that light scuffing will not damage the label in any way. What you may not realize is that we offer a number of laminates:
- High Gloss - our most popular laminate. It is the least expensive option and provides protection for the label and a high gloss shiny finish.
- Matte - provides your label with a quality matte finish. This is also the best laminate to choose if you want to hand write information on your labels.
- Thermal Transfer - a gloss laminate that is designed to work with most over-printing thermal transfer printers. We do recommend you get samples first to test through your own printer before placing an order with this laminate.
- UV Outdoor Gloss - best used for labels that will be used outdoors. It has a high gloss finish with excellent UV resistance. It is best paired with our vinyl material for the most durable outdoor label.
The price for these laminates are all slightly different. You can use our Instant Online Label Quoter to find a price for your labels with any of these different laminates. We also offer two materials that do not require over laminate and look great on their own: Estate #9 and Classic Crest. These materials are very popular with the wine industry.
How do I get a bar code for my products?
If you want to sell your products in retail stores then you need to get a bar code. The bar code on most retail products in this country is called a UPC (Universal Product Code), and you obtain them from the Uniform Code Council. You first need to become a member of what is mysteriously called their GS1 US Partner Connections. The amount you pay is dependent on the number of products you will be selling, and your company"s gross revenues.
The processing time is usually just 3-5 days and then you receive your company prefix number. You can then create your full bar code number for each product with the help of the membership kit you will receive. Once you have your number you just need the software to create your bar code. Here at Lightning Labels we will be happy to take care of that step for you.
If you have a small number of products (less than twenty) there is a more cost effective way to obtain a registered UPC code. Just type “buy a bar code” into Google and you will see many companies selling barcode numbers for far less than the UCC membership fee.
One point to remember when you are designing your labels - keep a space for the bar code. The official size requirement is around 1" high x 1.5" wide. In reality we do bar codes here that are as small as 0.5" high and 1" wide. Any smaller than that and you will have difficulty scanning them. One last important point: your bar code needs to be on a white background so that it can be scanned easily.
What is the best material for my labels?
The answer to that question is of course, “it all depends.” For most people our standard white BOPP material will work well. This is a great all purpose material, it is inexpensive, resistant to water and chemicals, quite durable, and has an attractive pearly shine to it. Unless you have specific needs, this is our recommended material.
Here is a list of our other materials with a brief explanation of each one:
- Clear BOPP - this has the same qualities as our White BOPP but in a clear version. It can provide a “no label” look when applied to your product. We can also do reverse printing on clear BOPP which is suitable for window labels.
- Chrome BOPP - has the same water and oil resistant properties as the White and Clear BOPP, but has the “mirror-like” look of shiny chrome.
- White Vinyl - is our thickest and most durable material. It is 4 Mils thick and is suitable for applications where greater strength or durability is needed. It is our recommended material if the label is to be used outdoors.
- Estate #9 (Textured) - is a cream colored textured material. It is very popular for wine labels, and labels for gourmet foods or high-end beverages. It is a paper stock and therefore not as durable as our BOPP materials, but it does have a unique look and feel that can be striking.
If you are still unsure what material you need then we suggest you request one of our free sample packs. This has actual label samples of all of our materials, so you can see for yourself which material would best suit your needs.
Why should I bother seeing a proof?
Before we answer that, let’s talk about the two kinds of proofs that we offer - PDF proofs and press proofs.
PDF Proofs
If color is not important to you a PDF proof is the way to go. The main advantage is speed, because files are sent via email and you can quickly look at the type and graphic elements to make sure they meet your expectations. Because colors vary between monitors and printers a PDF proof will not give you an accurate indication of the final press color.
Press Proofs
Also called a Hard Copy Proof, a Press Proof will show you exactly how your labels will look. It will be printed in full color on the same label material, it will have the same laminate, and you will see a die-line where the labels will be cut. We recommend Press Proofs for all new orders because you can see exactly how the colors will look when you receive your labels. And best of all your first Press Proof is free - you just pay for shipping.
Why bother with a proof?
In printing you should always double check your work, and then check it once more. We run across people who really think a proof is unnecessary and then when they get the labels they realize the mistake they have made. Proofing is all about preventing mistakes. We only recommend a PDF proof if color is not important at all. If you are even a little concerned about color you need to get a Press Proof. One of the many benefits of digital printing is that Press Proofs can be produced quickly and easily - make sure you take advantage of them. And then double check your proofs!
What do you mean by “digital printing”?
Simply put digital printing means producing a printed image that doesn’t use traditional printing plates. Basically, you go direct from an image on a computer to an image on a printed page. Digital printing has been around in some form for decades but it is only in the last 10 years or so that it has really come into its own.
If you own a laser or inkjet printer then you are doing digital printing. Whether it is a $40 inkjet printer or a million dollar digital printing press, the process is basically the same. The printer takes a computer image, which by definition is a digital image, and translates all the 0’s and 1’s into the appropriate color at the time of printing. Most color digital presses use four color process printing (see the previous question) which can produce millions of colors through a combination of Cyan, Magenta, Yellow and Black.
Comparing digital printing with traditional printing is useful to help understand how digital printing is different. Traditional printing uses a complex process with several steps. First, film is created for each color that is being printed. Then a printing plate is created from this film. Then the plate is mounted on a cylinder. Finally the cylinders for all the different colors are lined up and you can start printing. In digital printing a computer allows us to bypass all this.
Digital printing has secured the niche for short runs because of this reduced setup time. Not only that, but with digital label printing every label can be different. But for long runs of the same label you are often better off with traditional flexo label printing. In the label printing world digital printers print at 50-100 feet a minute, traditional label printing is typically 250-300 feet a minute.
What does “four color process” mean?
Whenever you pick up a magazine or read a modern newspaper you are reading the product of four color process printing. It is a standard for printing color worldwide, but what does it really mean?
It is quite an amazing procedure. Basically we can break down all color into four primary colors: Cyan (blue), Magenta (a purplish red), Yellow and Black, this is what is known as CMYK (K for black). When you look very closely at any printed color picture from a newspaper, magazine or a label under a very strong magnifying glass, you will actually see that it is made up of a series of dots. Not only that but these dots are always either Cyan, Magenta, Yellow or Black, or a combination of these colors.
Back in the old days a camera was set up with different filters and screen angles and four separate photographs were taken of an image to create the CMYK separations. Today, computer software handles this complicated process with ease. So what appears to be continuous color is always just a series of dots of four primary colors.
What does “full bleed” mean?

Understanding the concept of a “full bleed” is important if you want color on your labels that extends right up to the edge. This is best explained by an example. Let’s look at the label above. What we want is a 3” x 5” finished label indicated by the black die-line. For this complete background coverage of color, we actually create a box that is slightly bigger than our finished label. For most instances the size of the finished art that we use to print the label is 1/16” larger on all sides. So, the box that we create is actually 3.125” x 5.125”.
What is the reason for this extra space? It has to do with the way a label is created. When labels are created they are first printed on the label material and then they are die cut into the shape you want. This cutting is a mechanical process and the material can drift ever so slightly (up to 1/32”) during the die cutting. If you just had color without a full bleed then when the material shifted slightly you would notice a white area at the edge of your label. By adding 1/16” of color to all sides of your label you will ensure you will get a finished product that looks good and has color all the way to the very edge of your label.
What is “label unwind direction” and why is it important?

The unwind direction is simply the way in which a label unwinds from a roll. This is most easily explained by looking at the diagram above. There are four unwind directions. You can see that unwind direction #1 is when the top of the label comes off the roll first, #2 has the bottom edge coming off first, #3 is the right edge and #4 is the left edge.
Now, why is it important? Well, it is usually only important if you are having your labels applied by machine - if you are hand applying your labels then unwind direction typically does not matter. So, if you are applying your labels by machine, or having a contract manufacturer apply the labels then you will need to know the unwind direction. Most labeling machines will only be able to work with one unwind direction for each type of container.
One final point, if you are applying labels by hand now, but you may want to have them machine applied at some future point it is still good to consider unwind direction.